
Table of Contents
- Step by Step Guide to Make Google Slides to Play Automatically
- When Should You Play Google Slides on Loop?
- Method 1: How to Autoplay Google Slides in Presentation Mode
- Method 2: How to Make Google Slides Auto-Advance via “Publish to Web”
- Method 3: How to Embed an Autoplaying Presentation on a Website
- Common Mistakes to Avoid with Autoplay Settings
- Master Hands-Free Presentations Today
How to Autoplay Google Slides – Easy Guide to Play Google Slides on Loop



Step by Step Guide to Make Google Slides to Play Automatically
Imagine delivering your presentation without being tethered to a keyboard, or setting up a seamless digital display that cycles through your slides completely unattended. A hands-free presentation not only looks incredibly professional, but it also allows you to focus entirely on your delivery and your audience rather than the mechanics of your slide deck.
The good news is that you don’t need to download complex workarounds or third-party extensions to achieve this seamless experience. Google Slides is equipped with powerful, built-in features that allow you to automatically advance and continuously loop your presentations with just a few clicks.
In this PresentoVerse expert’s guide, you will learn exactly how to utilize these native settings. We will walk you through three different, simple methods to set up autoplay: during a live presentation, via a published web link, and through a direct website embed.
When Should You Play Google Slides on Loop?
While manually clicking through a slide deck is the standard for most traditional meetings, there are several scenarios where an automated, hands-free presentation is vastly superior. Setting your Google Slides to autoplay ensures a continuous, uninterrupted flow of visual information without requiring a human to constantly manage the screen. Understanding when to use this feature can elevate your digital communication and streamline your workflow.
Here are the most common and effective use cases for automated presentations:
- Digital Signage & Kiosks: If you are setting up an unattended booth at a trade show, a conference, or a digital display in a company lobby, autoplaying slides are essential. They allow you to run continuous promotional loops or informational sequences without needing a presenter on standby.
- Website Embeds: Embedding an automated presentation directly onto a webpage is an excellent, lightweight way to display interactive product demos, showcase creative portfolios, or share rotating informational dashboards with your site visitors.
- Live Webinars: During a live broadcast or webinar, managing your camera, engaging with the chat, and handling slide transitions simultaneously can be overwhelming. Setting your deck to auto-advance allows your visuals to run smoothly in the background, freeing you up to focus entirely on your delivery.
Method 1: How to Autoplay Google Slides in Presentation Mode
Setting up autoplay directly within Presentation Mode is one of the most straightforward methods. It is best suited for live presenting where you want the slides to progress naturally in the background, but you might still want the ability to pause or take manual control if you need to answer a question or spend extra time on a specific point.
Step 1: Open Your Presentation
- First, open your completed Google Slides file.
- Ensure all of your slides are finalized, formatted correctly, and arranged in the exact order you want them to display.
Step 2: Enter Presenter Mode
- Navigate to the top right corner of your screen.
- Click the “Slideshow” button to enter the full-screen presentation view.
Step 3: Access the Auto-Advance Menu
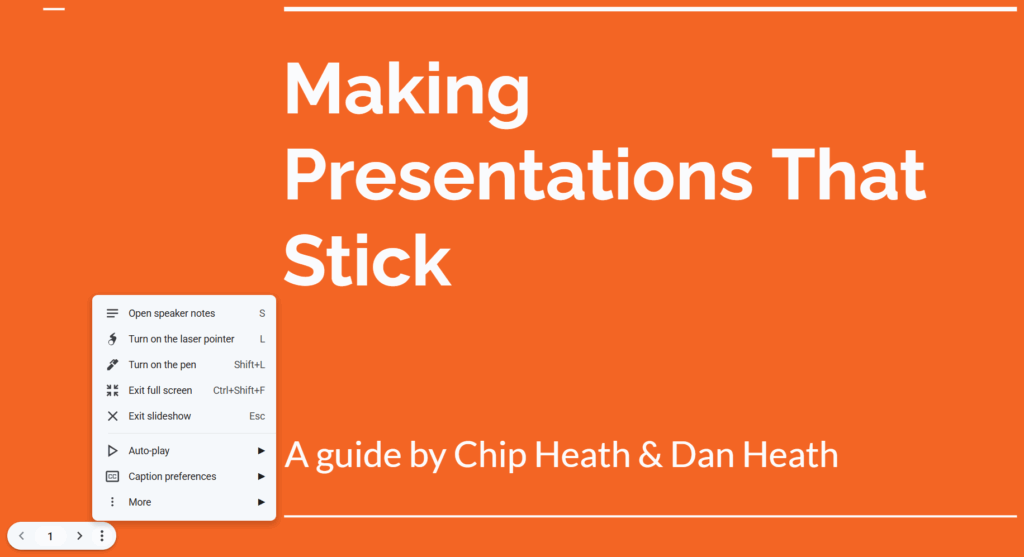
- Once you are in full-screen mode, move your cursor toward the bottom-left corner of the slide to reveal the hidden presentation control panel.
- Click on the three-dot menu icon, which opens up more options for your slideshow.
Step 4: Set the Timing and Enable Loop
- From the menu, hover over or click “Auto-play” (sometimes referred to as Auto-advance).
- Choose your preferred time interval for how long each slide should stay on screen (e.g., 3, 5, or 10 seconds).
- If you want the presentation to repeat continuously in a never-ending cycle, click “Loop” from the exact same menu.
- Finally, click “Play” to begin the automated progression of your slides.
Method 2: How to Make Google Slides Auto-Advance via “Publish to Web”
This method is ideal when you want to share a clean, professional playback link with an audience without granting them edit access to your original file. It is also the perfect, most reliable solution for running unattended, continuous loops on digital signage or display kiosks.
Step 1: Open Publishing Settings
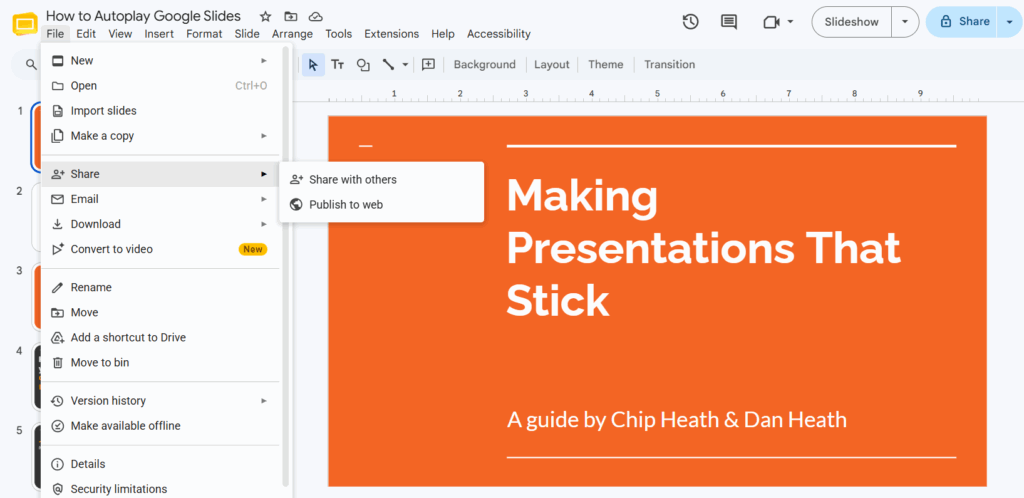
- Navigate to the top menu bar inside your Google Slides document.
- Click on File, hover over Share, and select Publish to web from the dropdown menu.
Step 2: Configure Auto-Advance and Looping
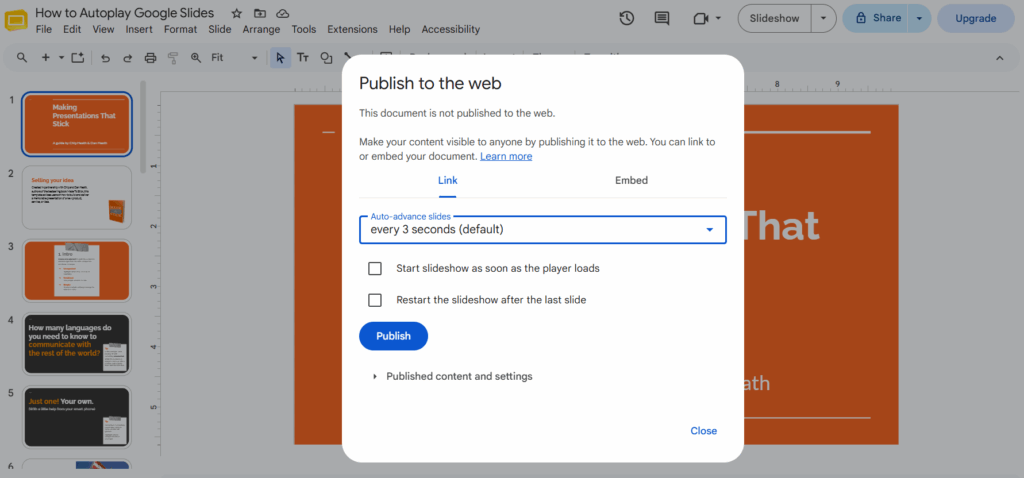
- A new dialog box will appear. Make sure you are viewing the Link tab.
- Check the box next to “Start slideshow as soon as the player loads” so the presentation begins automatically when someone opens the link.
- Under the “Auto-advance slides” dropdown, select your preferred timing to dictate how long each slide should stay on the screen.
- To enable continuous looping, check the box that says “Restart the slideshow after the last slide.”
- Once your settings are dialed in, simply click the yellow Publish button to generate your shareable, auto-playing link.
Method 3: How to Embed an Autoplaying Presentation on a Website
Integrating an automated slideshow directly into your website’s HTML is an excellent way to showcase product demos, visual portfolios, or informational dashboards. By embedding the presentation directly onto a webpage, you create a dynamic, engaging experience for your visitors without forcing them to manually click through the content themselves.
Step 1: Get the Embed Code
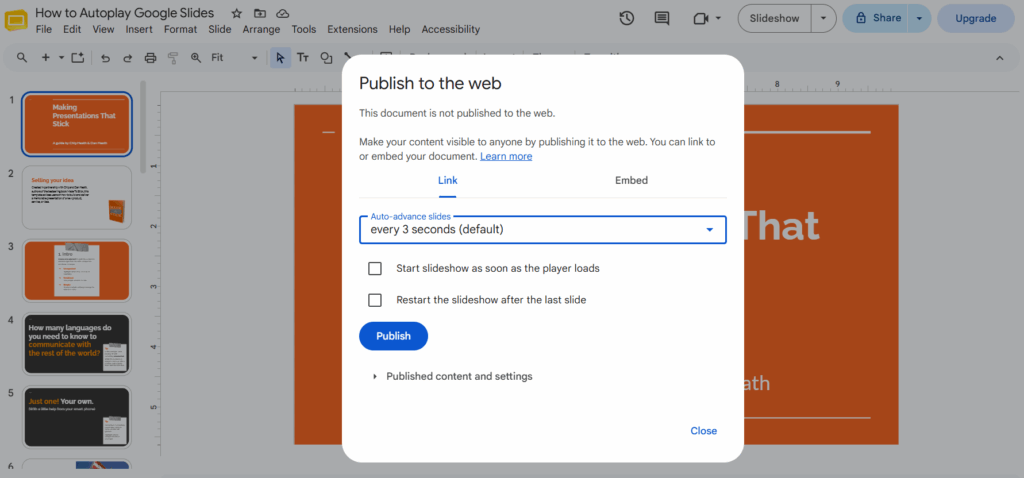
- Open your Google Slides presentation and navigate to the top menu bar.
- Click on File, hover over Share, and select Publish to web.
- In the dialog box that appears, switch from the “Link” tab to the Embed tab.
Step 2: Adjust Embed Settings
- Choose your preferred Presentation size (Small, Medium, Large, or Custom) to ensure it fits perfectly within your website’s layout.
- Under the “Auto-advance slides” dropdown, select the timing interval for how long each slide should display.
- Check the box for “Start slideshow as soon as the player loads” so it begins automatically when a user visits the webpage.
- Check the box for “Restart the slideshow after the last slide” if you want the presentation to loop continuously.
Step 3: Paste Code on Your Site
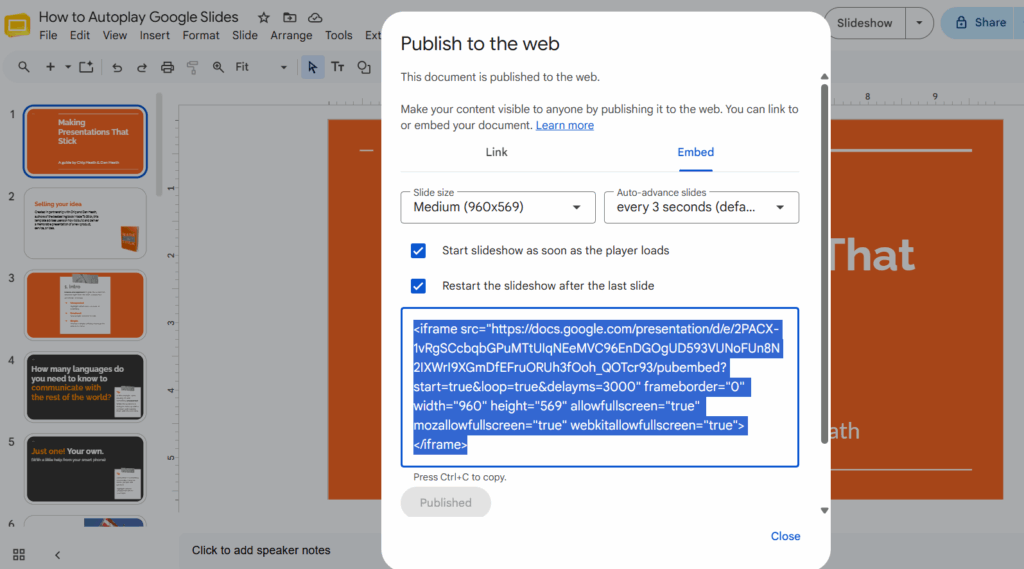
- Once your settings are configured, click the Publish button.
- Google Slides will generate a block of HTML iframe code. Copy this entire code snippet.
- Navigate to your website’s backend (such as WordPress, Shopify, or a custom CMS) and paste the HTML code directly into the block or page where you want the presentation to appear.
Common Mistakes to Avoid with Autoplay Settings
Setting up an automated presentation is incredibly simple, but a few small oversights can quickly ruin the viewing experience. To ensure your slides run flawlessly and your audience stays engaged, make sure to avoid these four common troubleshooting pitfalls:
- Setting the Timing Too Fast: It is tempting to keep the presentation moving quickly, but setting your slides to advance every 1–2 seconds makes your content completely unreadable. For text-heavy slides or complex diagrams, always stick to a more comfortable 5–10 second interval so your audience actually has time to digest the information.
- Forgetting to Enable Loop: If you are setting up an unattended digital kiosk, a trade show display, or a website embed, you must remember to check the setting that restarts the slideshow after the last slide. Without the loop enabled, your presentation will stop dead at the final slide, leaving a static screen and defeating the purpose of an automated display.
- Using Click-Triggered Animations: This is the most common reason an automated presentation freezes. If you have text or images set to animate “On click,” the autoplay feature will halt and wait for a manual input, completely breaking the automation. To fix this, review your presentation and change all animation settings to “After previous” or “With previous.”
- Overlooking Internet Requirements: If you are using the “Publish to web” method for a live event or digital signage, remember that the playback link relies on a continuous connection. A spotty network will cause your auto-advancing slides to buffer, glitch, or freeze entirely. Always ensure you have a highly stable, reliable internet connection wherever the presentation is being displayed.
Master Hands-Free Presentations Today
Setting up Google Slides to autoplay is an incredibly simple process that completely transforms the way you display information. Whether you are running an unattended digital kiosk, hosting a live webinar, or embedding a dynamic product demo directly onto your website, utilizing these native automation features allows you to deliver a seamless, hands-free experience without ever touching a keyboard.
Of course, an automated presentation is only as effective as the slides themselves. To ensure your automated deck looks highly professional and keeps your audience captivated on every single loop, skip the basic default themes. Test out these new autoplay methods on a beautifully designed, premium template from the PresentoVerse free Google Slides Infographic Templates library today, and elevate your visual communication instantly.
-
How to Start a PowerPoint Presentation: 7 Strong Opening Strategies for Success
Stop Boring Your Listeners: Dynamic Ways to Begin Your Next PowerPoint Presentation There is nothing more intimidating than a blinking cursor on a blank white slide. You know your topic inside and out. You have done the research. Yet, when it comes time to design that first slide and plan your opening remarks, you freeze….
-
Marketing Fundamentals: The Ultimate Guide to the 7 Ps of Marketing
Marketing Fundamentals: Everything You Need to Know to Develop a Marketing Strategy Marketing isn’t just advertising; it’s the engine that drives your entire business. While catchy slogans and viral videos get the glory, the real work happens in the strategy. At its core, marketing is the process of identifying, anticipating, and satisfying customer requirements profitably….
-
How to Write an Executive Summary (With Professional Executive Summary Templates)
Guide to Writing a Powerful Executive Summary Let’s be honest: busy executives, angel investors, and key stakeholders rarely have the time—or the patience—to read a dense, 50-page business plan or project proposal. In the fast-paced corporate world, decisions are often made based entirely on the very first page they read. If you don’t capture their…
-
PowerPoint 101: The Beginner Guide to Use Microsoft PowerPoint
Quick Guide for Mastering PowerPoint Presentation Opening a blank PowerPoint canvas for the first time can be incredibly intimidating. With endless menus, complex ribbons, and a massive array of formatting options staring back at you, it is easy to feel overwhelmed. But here is the truth: mastering PowerPoint does not require a graphic design degree….
Related Blogs
-
How to Start a PowerPoint Presentation: 7 Strong Opening Strategies for Success
Stop Boring Your Listeners: Dynamic Ways to Begin Your Next PowerPoint Presentation There is nothing more intimidating than a blinking cursor on a blank white slide. You know your topic inside and out. You have done the research. Yet, when it comes time to design that first slide and plan your opening remarks, you freeze….
-
Marketing Fundamentals: The Ultimate Guide to the 7 Ps of Marketing
Marketing Fundamentals: Everything You Need to Know to Develop a Marketing Strategy Marketing isn’t just advertising; it’s the engine that drives your entire business. While catchy slogans and viral videos get the glory, the real work happens in the strategy. At its core, marketing is the process of identifying, anticipating, and satisfying customer requirements profitably….